Create a ”personalized sketch doll” and make it pose!
DesignDoll is a software program that can freely manipulate human body models in 3D space.
You can create postures and compositions that artists demand, with easy, intuitive operations.
Download
DesignDoll Ver6.1 was released! Read about the newly added features below
FeaturesDesignDoll is a software program that can freely manipulate human body models in 3D space.
You can create postures and compositions that artists demand, with easy, intuitive operations.
Download
With DesignDoll, you can create a human model pose collection and export 3D models to our pose-sharing website “Doll-Atelier.”
Windows® 11
Windows® 10
Windows® 8
Windows® 7
Most of the built-in functions are based on requests from our customers

DesignDoll uses a blending method, where forms and sizes of various parts to be changed freely, allowing models to be reproduced with head to body ratios that intuitively suit the drawing

With various perspective functions, deformations resembling hand drawings or emphatic expressions that cannot be represented with other 3D software are possible. Along with parallel projection, false perspectives, real perspectives and lens perspectives, functions such as eye level displays and change of camera perspective (viewing angle) are also available

A dedicated controller for moving fingers minutely has been made available. By creating the rough shape in simple mode, then moving on to detailed mode, hand shapes can be created quickly

DesignDoll can set multiple body models within the same scene, allowing complex compositions in which sketches tend go askew to be drawn easily. By observing from every angle, the breadth of possible expressions is increased xemu convert iso to xiso

Data you create can be used repeatedly, reducing creation time, by simply dragging pose and body shape icons onto new models.

In pursuit of pose creation speed, DesignDoll is designed to manage postures with minimal controllers. Minute adjustments can even be made by directly dragging points on the 3D models.

With its bone adherence function, DesignDoll can link items created with external software to specific parts. No need to go through bothersome processes such as fitting a sword to a hand after deciding on a posture

DesignDoll can create in-between faces and body shapes, by synthesizing the difference between two existing models into one new model. By repeatedly synthesizing, growth process of a character can be created easily your original ISO file and choose an output location

Used together with the pose and model sharing website “Doll-Atelier,”DesignDoll users can share designs to be used freely for anything, commercial or non-commercial

DesignDoll can apply pre-set or customized effects with a single click. By setting-up effects that suit you, you can focus more attention on the relationship between your models and their environment

By creating box shaped items along grids, DesignDoll eliminates the bothersome task of drawing perspective lines

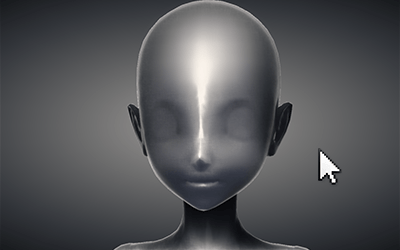
Painting directly onto 3D models has now become possible. By drawing auxiliary lines such as the location of eyes or hairlines onto each character, you can create personalized sketch dolls, in a manner which is difficult with actual sketch dolls Run the following command: Here’s a concise guide

With DesignDoll, you can freely set light sources to create your envisioned image. Since this fosters greater comprehension of three-dimensional objects, it is an optimal tool for illustration practice as well

By clicking on a pose or a hand icon, library data can easily be applied to a pose being created. Stock your favorite data – and the trouble of searching for or recreating 3D models can be eliminated, enabling the quick creation of high quality drafts

DesignDoll can export, import, and synthesize 2D data, and export 3D data to other 3D software programs
With DesignDoll, you can create a human model pose collection and export 3D models to our pose-sharing website “ Doll-Atelier .”
With the new Clay Tag, you can change the very shape of model parts.
Tag detail adjustments allow you to fine-tune your changes.
You can even make asymmetrical changes to the models.
We’ve added a new memo tag.
Add notes on any model to help manage your object list.
Memos are displayed in the top folder.
Selecting the memo will automatically bring up the model with the memo tag.
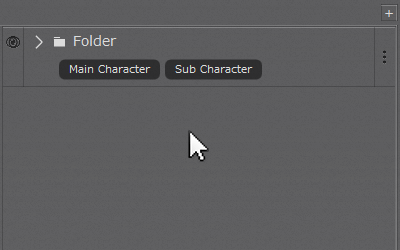

You asked for it, so we added a folder function.
We’ve adjusted the UI to improve usability.
Tag lists automatically wrap as you adjust the menu zoom, keeping them visible.
your original ISO file and choose an output location. Click "Go" or "Create". Alternative Method: Web-based Converter
Open a terminal or command prompt in the folder containing game.iso . Run the following command:
Here’s a concise guide on converting an ISO to XISO for use with (original Xbox emulator):
Standard Xbox ISOs are typically around because they include padding and a video partition. An XISO removes this unnecessary data, often reducing the file size significantly—sometimes to less than 1 GB —making it more efficient for storage and emulation. Best Tools for Converting ISO to XISO
Even after conversion, you might run into issues. Here are the most common problems and their solutions.
The Complete Guide to Xemu: How to Convert ISO to XISO for Optimal Emulation
Once you have a working XISO, you can convert it to (Compressed Xbox ISO) to save up to 30-50% disk space. Xemu can load CCI files natively, and they load faster than XISOs.
I can provide specific troubleshooting steps or command-line shortcuts tailored to your exact setup. Share public link
mount an XISO in Windows File Explorer – it will crash explorer.exe and may corrupt the file.
Type the following command (replace gamename.iso with the actual name of your file): extract-xiso -c gamename.iso Use code with caution. Press .
This public link is valid for 7 days and shares a thread, including any personal information you added. This link or copies made by others cannot be deleted. If you share with third parties, their policies apply. Can’t copy the link right now. Try again later.
This guide explains what XISO is, why xemu uses it, when you might need to convert an ISO to XISO, and step‑by‑step methods (tools, commands, tips, and troubleshooting). It covers Windows, macOS, and Linux workflows, validation, advanced options, and common pitfalls.

The Scale Tag’s new Simple Adjustment Mode lets you make rough adjustments to model bodies.
Controllers are split between the left and right sides of the body, for adjusting length (buttons) and thickness (rings).
Adjust the length and thickness of parts by dragging.
Intuitively make body type adjustments, even after posing.
The current Scale Tag will become the Detail Adjustment Mode, and has an easier user interface.
Perfect your body type in Detail Adjustment Mode, after making rough changes in Simple Adjustment Mode.
Click on specific bones to make individualized detail adjustments.
Drag the rings to adjust bone thickness on both axis, or drag one of the balls to adjust the thickness of each axis independently.
Expand or shrink the whole bone by dragging the ball in the middle of the bone.


Now you can adjust the thickness of each bone’s base and tip.
Change bone balance and make them narrow or widen how you like.
This feature is found in the Scale Tag’s Detail Adjustment Mode.
Bone thickness can be adjusted from base to tip by dragging the ring controllers.
When the thickness of a bone’s base and tip are different, you can now adjust the feel of the transition with a Bezier graph.
With this, you can make transitions sudden or gentle.
A profile of the transition is displayed above the graph.


The length and thickness of fingers can now be adjusted.
Perfectly match your model’s hands to their height.
Quickly & intuitively customize fingers with sliders.
Test-out variations to find the perfect combination of adjustments.
These features were included in the Scale Tag, instead of the Hand Tag, to ensure that adjustments are included in Mix Model combinations.
When using viewing angle adjustments for impact, your degree of freedom within the composition is limited, and the results often don’t feel right. By using DesignDoll’s “false perspective function”, you can easily and freely make perspective distortions to attain a natural fit for your artistic vision
Specific parts can be emphasized
Because the false perspective function uses camera manipulations, there is no need to re-edit the head to body ratio of the model or the pose


The camera perspective functions of DesignDoll are ideal for creating “compositions with a natural, hand-drawn feel” instead of the computer-generated feel of other 3D programs. We know you’ll enjoy this convenient function that brings your compositions closer to the images seen by the naked eye, while maintaining the integrity of your illustrative vision.
Real perspectives that can adjust to natural curves
Lens perspectives that can reproduce wide-angle and fish-eye lens effects
Eye level or camera height display functions
You can download any poses and models uploaded onto the user website “Doll-Atelier”
Models & PosesImport your favorite poses from the website with a single click
Significantly reduce model creation time by synthesizing pre-set data and creating elements from it
Imported poses can be used freely, for commercial or non-commercial applications


your original ISO file and choose an output location. Click "Go" or "Create". Alternative Method: Web-based Converter
Open a terminal or command prompt in the folder containing game.iso . Run the following command:
Here’s a concise guide on converting an ISO to XISO for use with (original Xbox emulator):
Standard Xbox ISOs are typically around because they include padding and a video partition. An XISO removes this unnecessary data, often reducing the file size significantly—sometimes to less than 1 GB —making it more efficient for storage and emulation. Best Tools for Converting ISO to XISO
Even after conversion, you might run into issues. Here are the most common problems and their solutions.
The Complete Guide to Xemu: How to Convert ISO to XISO for Optimal Emulation
Once you have a working XISO, you can convert it to (Compressed Xbox ISO) to save up to 30-50% disk space. Xemu can load CCI files natively, and they load faster than XISOs.
I can provide specific troubleshooting steps or command-line shortcuts tailored to your exact setup. Share public link
mount an XISO in Windows File Explorer – it will crash explorer.exe and may corrupt the file.
Type the following command (replace gamename.iso with the actual name of your file): extract-xiso -c gamename.iso Use code with caution. Press .
This public link is valid for 7 days and shares a thread, including any personal information you added. This link or copies made by others cannot be deleted. If you share with third parties, their policies apply. Can’t copy the link right now. Try again later.
This guide explains what XISO is, why xemu uses it, when you might need to convert an ISO to XISO, and step‑by‑step methods (tools, commands, tips, and troubleshooting). It covers Windows, macOS, and Linux workflows, validation, advanced options, and common pitfalls.